How do I set up eGIRO with Mari Business Account?
Set up eGIRO on your Mobile Phone
To set up eGIRO on your mobile phone, refer to the steps below. For Desktop set up, you may also refer to the instructions after the mobile phone guide. Please note that if your Mari Business Account signing condition is ‘Singly’ (one user can create and approve all transactions), you may need to select the Retail eGIRO linkage option, instead of Corporate.
.png)
Step 1: Select MariBank on the Billing Organisation's app or website. If MariBank is not available as an option, please check with the Billing Organisation.
Step 2: Tap on the QR code shown and you will be redirected to the MariBank app to confirm your login.
.png)
Step 3: After confirmation, return to the Billing Organisation’s app or website and select your Mari Business Account.
Step 4 (Optional): You may also add in additional information such as payment limit and expiry date before clicking Next.
.png)
Step 5: Review your information before submitting the request.
Step 6: You will be prompted to confirm and authorise your eGIRO setup via the MariBank app.

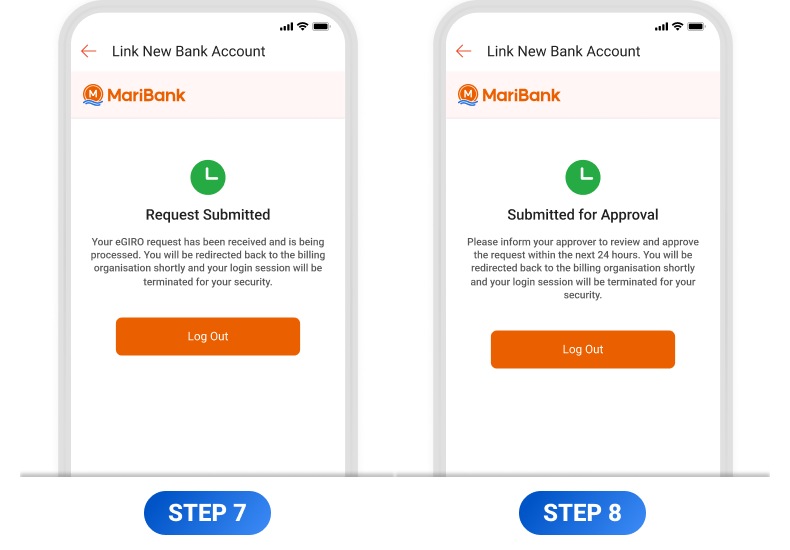
Step 7: If your Mari Business Account signing condition is ‘Singly’ (one user can create and approve all transactions), your request will be submitted and processed by the Billing Organisation. A notification will be sent to you once the eGIRO set up is completed.
Step 8: If your Mari Business Account signing condition is ‘Any 2 Jointly’ (any two Authorised Users are required to jointly execute transactions), please inform your approver to approve the request in the next 24 hours.
Continue to Step 9 if your Mari Business Account Signing condition is ‘Any 2 Jointly’

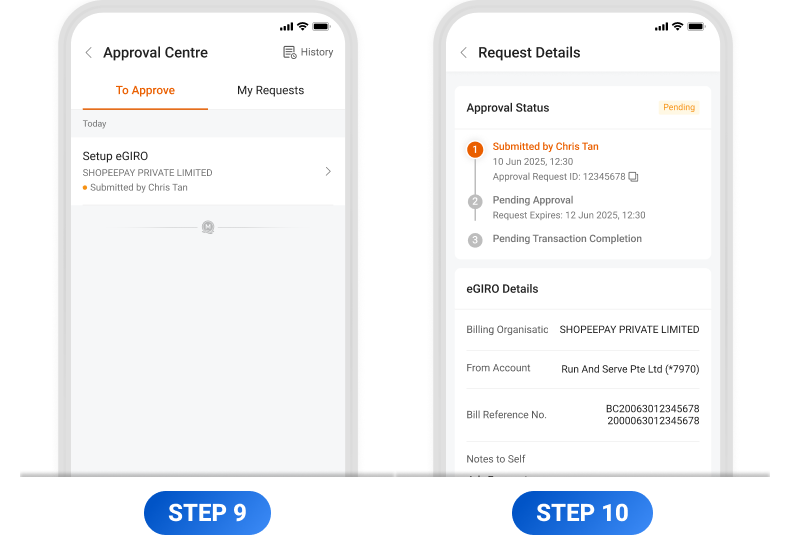
Step 9 and 10: Your approver will receive a notification on their MariBank app to approve the eGIRO set up. This request can also be found in the Approval Centre. Once the request has been approved, your request will be submitted and processed by the Billing Organisation. A notification will be sent to you once the eGIRO set up is completed.
Set up eGIRO on Desktop
Please note that if your Mari Business Account signing condition is ‘Singly’ (one user can create and approve all transactions), you may need to select the Retail eGIRO linkage option, instead of Corporate.
.png)
Step 1: Select MariBank on the Billing Organisation's website. If MariBank is not available as an option, please check with the Billing Organisation.
.png)
Step 2: Scan the QR code using your MariBank app to confirm your login.
.png)
Step 3: Tap on Confirm to authorise your login.
.png)
Step 4: After confirmation, return to the Billing Organisation’s app or website and select your Mari Business Account. You may also add in additional information such as payment limit and expiry date before clicking Next.
.png)
Step 5: Review your information before submitting the request. You will be prompted to confirm and authorise your eGIRO set up via the MariBank app.
.png)
Step 6: If your Mari Business Account signing condition is ‘Singly’ (one user can create and approve all transactions), your request will be submitted and processed by the Billing Organisation. A notification will be sent to you once the eGIRO set up is completed.
Otherwise, skip to Step 7 if your Mari Business Account signing condition is ‘Any 2 Jointly’ (any two Authorised Users are required to jointly execute transactions).

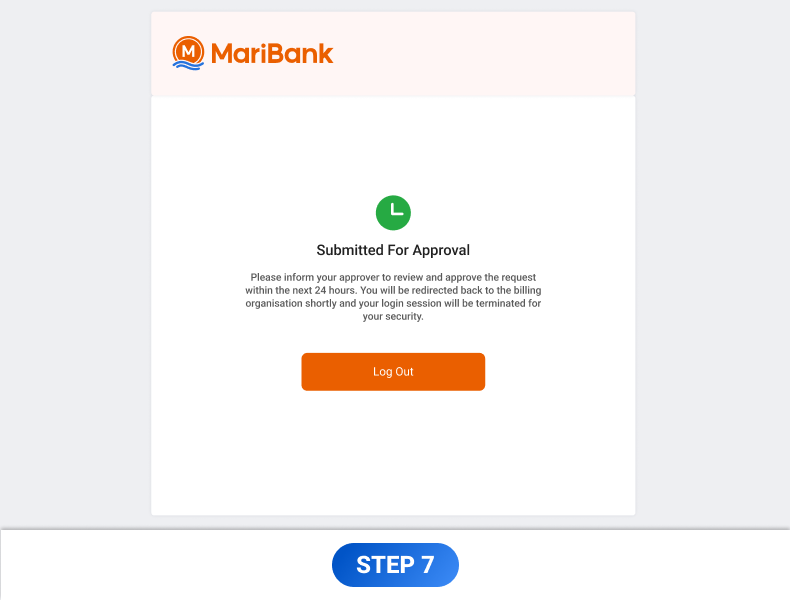
Step 7: If your Mari Business Account signing condition is ‘Any 2 Jointly’ (any two Authorised Users are required to jointly execute transactions), please inform your approver to approve the request in the next 24 hours. Continue to Step 8.

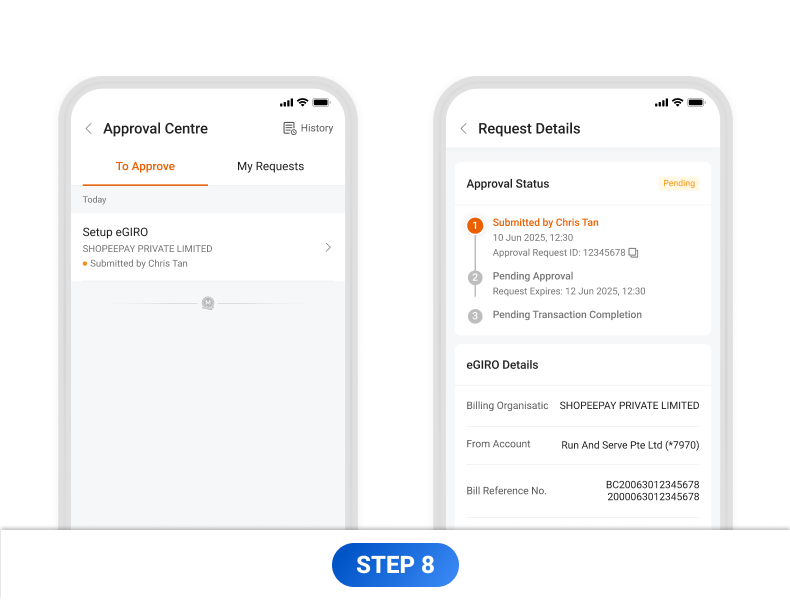
Step 8: Your approver will receive a notification on their MariBank app to approve the eGIRO set up. This request can also be found in the Approval Centre. Once the request has been approved, your request will be submitted and processed by the Billing Organisation. A notification will be sent to you once the eGIRO set up is completed.
Contact Us
Our 24/7 Customer Service Team is here for you if you have any questions!


